|
Home Online Course Directory Previous Course - 101 Next Course - 103 |
Course 102 - Wind Knowledge |
|
Wind speed and direction could be classified as the most important factor to
learning to fly. Too little wind and your kite may not get off the ground, to much wind and YOU
may be off the ground or your kite may sustain permanent damage. Trying to learn this exciting
sport with a kite that is either too big or too small for the present wind conditions can make your
learning experience a very frustrating one. This doesn't mean that you need to go out and purchase
an arsenal of different size kites, you may just need to wait until the wind increases or decreases for
the kite you currently have. You don't need to know the "exact" speed and direction of the wind, but you do want to have a very good idea of how strong it is and where it is coming from. If you are starting out with a power/traction kite, be very careful! Power kites are designed to pull surfboards, buggies, mountain boards, snowboards and YOU! Too much wind for your kite and you could be in for a ride that may end up in the emergency room. Many kite flyers will use a windsock or spinsock to give them an idea on wind direction and speed. Many others look at branches on trees or other vegitation to give them an idea on wind speed and direction. If you have some extra cash, you could invest it in a high-tech hand held electronic wind meter. For me, most of the time I just glance at the branches on a tree located at the end of the park we frequently buggy at. |
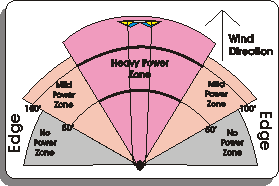
 Diagram 1A click to enlarge |
The diagram on the left (Diagram 1A) shows the "Wind Window" - the pink
and tan areas. These represent the area where your kite should be able to perform best. The pink
area is where your kite is directly in the winds path, this area will give you the greatest amount of
pull if you are flying a traction/power kite; or the best control and speed if you are flying a stunt/sport
kite. The tan areas are where the kite will start to decrease in power or slow down. Turns
are usually done in the Tan area as well as launching and landing your kite. The edge (grey area)
of the "Wind Window" is at the end of the Tan area and is where the least amount of wind is on
the kite. The exact location of the edge of the wind window will vary depending on the style of kite you
are flying. Usually when a kite approaches the grey area or edge, it will begin to "luft"
or "stall", causing the kite to drop out of the air. If this happens, you may have to take
a couple quick steps backwards to bring your kite back into the tan area, allowing you to turn your kite and
continue flying. |
|
Forcing your kite to fly past the
edge of the wind window and slightly towards the ground will allow you to safely land your kite, regardless
of wind power. As you fly your kite across the horizon, be prepared for the increase in speed and power as
the kite passes through the wind window. Many people have had an unfortunate encounter with the ground
by underestimating the strength of the wind in the pink area, this is especially important for people learning
to fly power kites. Some ram-air style kites have the ability to create additional power as they increase in
speed through turns, generating even more power than usual as they continue their turn and as they pick up speed
passing through the center of the wind window, this can be quite challenging for the beginning kite flyer. |
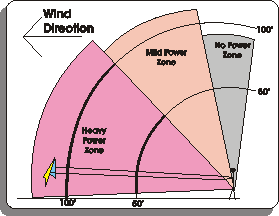
 Diagram 1B click to enlarge |
Diagram 1A above shows you the horizontal view of the wind window (side to side),
the wind window also has a vertical area (up and down) as illustrated in diagram 1B. The pink
area illustrates the heavy power window, as your kite climbs in altitude, power and speed will decrease.
The tan area is the light power area and again, the grey area would represent the upper edge of the
wind window. Some kite flyers have nicknamed the edge of the vertical wind window as the
"rest" position. Once again, all kites are different from each other and will react differently throughout the power window areas. For instance, if the wind is extremely strong, ram-air style kites could still have tremendous power (in the form of lift) at the edge of the vertical power window. Other kite designs, mostly surf kites, are designed to give incredible amounts of lift at the top of the wind window. To find out how your kite will perform, learn how it reacts on a day that the winds are calmer. This will let you know what to expect from your kite in heavier wind conditions. |
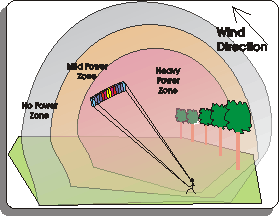
 Diagram 1C
click to enlarge |
Diagram 1C shows a another view of the power window. The power in different areas of the window
can change from time to time when the wind changes. A change in wind direction may put the heavy power window
in a different place than you last known it to be. Strong wind gusts can also be surprising and sometimes a danger.
A strong gust of wind can pull you downwind, or even pull you over...even if your kite is on the edge of the power window.
Always try to be aware of the wind and what it is doing while you fly. The more you fly, the more comfortable you will be with the power of your kite and the strength of the wind. Experienced kite flyers can feel a difference in the wind force through the kite, lines, and handles, and they are usually able to adjust for it more quickly than beginners. We suggest to many people who are learning to fly to keep in mind the feeling of the wind on their backs, their hair, or the backs of their ears to help them determin the force of the wind and direction. A wind sock or electronic wind meter is a better and more precise way of determing wind direction. |
|
If you are unlucky enough to have one nearby, you can get a good idea of
the wind direction by slowly turning your head back and forth until you feel or hear the wind equally against the back of your ears.
When you feel the wind equally, you should be looking directly downwind, this will give you an idea of the wind window, and the area
you will be able to cover when you fly. |
|
Online Course Directory Home |
Site Design by GamelordProductions.com


