|
Home Online Course Directory Previous Course - 103 Next Course - 105 |
Course 104 - Kite Lines |
|
Kite line comes in many different sizes, diameter, lengths, weights, and construction.
Choosing the right line for you kite is almost as important as choosing the kite itself. If your line
is too small it may break, causing you to damage or lose your kite, or causing injury to yourself or other
around you, or in the worst case...both. If you have a line that is too large, your kite may not
respond correctly causing you to lose control of your kite, or your kite may not fly at all. The
construction of the line itself is also very important. Different types of line will have different
characteristics, some will stretch and stay stretched, others will stretch and rebound back to their original
shape, some are slippery and will slide when twisted around themselves, some may not slide at all.
Longer lines can slow down the response of your kite, making it easier for some people to control their kites.
Longer kite lines can also increase the area of the power window for traction kites. Shorter lines can
make your respond much quicker and can get your kite out of the power faster. The best way to know what line you need is to understand what makes each type of line different. After understanding the characteristics of kite line, choosing the right line will be a breeze. We will cover the basic types of line and the advantages/disadvantages of each type. We will also explain the weights and lengths, and the effect they have on control, power, and speed of your kite.
|
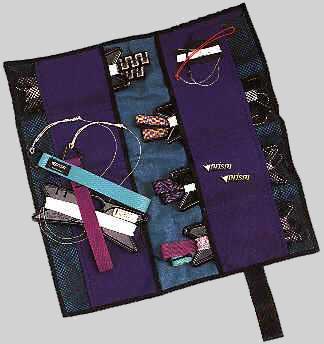 Prism Line Set Organizer Bag |
| Dacron |
| Advantages | Disadvantages | ||
|
|
||
|
Spectra Blend (usually spectra line with a polyester weave.) |
| Advantages | Disadvantages | ||
|
|
||
|
Spectra |
| Advantages | Disadvantages | ||
|
|
||
Things to be aware of with kite lines.
|
 Spools of kite line. |
|
Sleeves and knots. As mentioned above, knots in your kite line can reduce the strength of your line. If you need to tie a knot in you line or re-sleeve your line, the diagram on the right will show you the proper way to do it. The most important thing to remember when tying a knot in your line is to make sure there are no twists in the lines and that both ends of the line are perfectly parallel throughput the knot (none of the lines run over the other). It is a good idea to check your lines for line stretch from time to time. An easy way to do this is to stake your lines at one end with a kite stake or a long screwdriver. Make sure both lines (or sets) are equal on the staked end, then move to the other end of your lines and firmly pull on the lines and see if they stretch to the same length. If you find that one line is shorter than the other, you can undo the knot on the longer line, slide the sleeve up the line (if your line is sleeved) to the appropriate point equal to the shorter line and then loop and re-tie the knot and cut off the leftover line. Remember to leave enough extra length in your loop to make up the length of line used by the knot (approximately 1/2" of length is used in the knot depending on the line thickness). You can also put a loop in your line without using any knots at all. This is called a knot-less loop or splice. For information on how to do this along with a step-by-step procedure, click HERE. Line lengths. |
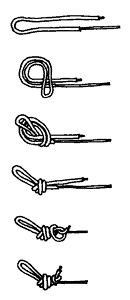 Sleeve & knot. |
|
Different lengths of line will change the performance of your kite. Longer lines
generally have more stretch and drag than shorter lines. Longer kite lines can slow down the response
of your kite, making turns respond slower and take up more area to complete. Kite speed will
appear to be slower on longer lines. This is caused by your kite traveling in a longer arc through the
power window. For example: Take a 12" string and tie it around a cork and then spin it around above
your head, the cork will spin at a very fast speed. Now take a 5 foot long string and tie it around the
cork and do the same. The cork will actually cover more distance, but will appear to be traveling at a
slower speed than on the shorter string. The arc on the longer string (where the cork is located) is
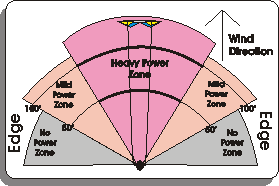
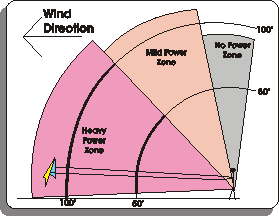
greater than the arc created by the shorter sting. Power kite fliers will usually use longer lines than stunt kite fliers. The longer the lines are on a kite, the longer the arc is and the larger the power window is, creating more useable power for the kite (see the diagrams on the right). Power kite fliers will usually use a line length of 75' to 150', depending on the wind conditions. In stronger winds, shorter lines will allow you to get your kite out of the power faster and help you maintain control of a larger kite. In mild wind, longer lines will let you keep your kite in the wind window longer, creating more power for smaller kites. In some cases you may not need to purchase a different size kite to be able to fly, just a different length line set. Stunt kite fliers will usually use shorter lines. Shorter lines can improve the performance of your kite. Turns will be quicker and take much less room to complete. Speeds will be faster and responses to your controls will be more accurate and precise. Line drag and line stretch will be minimal. Stunt kite fliers will usually use line lengths of 50' to 100' in length. If you are new to this sport, I would recommend a line set of 100' for a stunt kite and not less than 100' for a power kite, as you become more familiar with your kite you can purchase other line sets of different lengths to find the best one for your style. If you have a line set that is damaged, you may be able to use the undamaged section of those lines to make a shorter set or lengthen an existing line set, giving you even more flexibility. Connecting your line - Tips and Tricks. Most pre-made line sets will have loops tied into the ends of the line. These loops are there to give you an easy way to connect and disconnect your lines from your kite and handles. The loops are designed to be used with a "Larks Head". |
  |
|
The diagram on the right will show you
the way to use a "Larks Head" to attach your lines. Larks Head knots are the ideal knot to use with your lines because it is very easy to use and also very easy to remove. A simple tug on the knot and the Larks Head will loosen, allowing you to remove your lines from your kite and handles for storage. Some people will attach a length of line to the end of their handles for adjustment purposes. This line is normally only attached to the handles and used for the bottom lines or "brake" lines of a quad line kite. The rope is tied off with knots in 1 1/2" to 2" increments. By simply moving the connecting point of the brake lines up or down the knots in the attached line, you can easily adjust your brakes on your kite for the current wind conditions. Moving the attachment point towards the handles will shorten your brake lines, giving your kite less speed. Moving the attachment point outwards towards the kite will lengthen your brake lines giving your kite more speed. This trick when used with the Larks Head will make adjustments to your brake lines very easy and quick. Below is a diagram of the rope with knots at 2" inch increments. To attach your adjustment rope to your handles, simply tie a loop into one of the ends of the rope (as shown above in the sleeve and knot section) and then attach it to your handles with its own Larks Head. You will need to adjust your lines for the correct length after installing the adjustment rope to your handles as it will lengthen the lines it is used on. If your lines are not equal, you may not be able to properly control your kite. In most cases, an additional length of rope will need to be added to your top lines that is equal to the overall length of rope used on the bottom lines. Attach your lines to the connecting point closest to the handles on both the top and bottom lines to start with, then move the bottom lines out until you reach the desired position for optimum control. |
   Larks Head Knot |
|
Rope with knots. |
|
Line weight. Line weight is the amount of stress a line can handle before breaking. Power kites will require a line weight greater than that of a stunt kite. The larger the weight number on your line, the more pressure your line can handle before breaking. A 200# line can handle 200 pounds of pressure per foot per line. A quad line kite using 200# line can handle a total of 800 pounds of pressure per foot (the average male weighs only 190 pounds). Most power kites will require line weights starting at 200# and can go up to 800#. Stunt kites will usually use line weights of 50# to 100#. Single line kites will usually only require line up to 50#. Line weights are selected depending on the weight of the user, the style of the kite, and the size of the kite. Usually, the larger the kite, the heavier the line will need to be. Quad line power kites can have multiple line weights in a set. Usually the brake lines (bottom lines) are not used nearly as much as the upper lines (control lines) and can be substantially less weight. A common set for a 4 meter quad line power kite could be 400# lines on the top and 200# lines on the bottom. All kites are made differently. Check with the manufacturer of your kite to determine the proper line weight for your kite. If in doubt, a line set that is too heavy is always better than a line set that is too light. A line set that is too heavy will only slow your kite down with line drag, a line set that is too light will break. As always, you can e-mail us here at AWindOfChange.Com and we can help you select the right line set for your kite. You can contact us by clicking here. |
|
Online Course Directory Home |
Site Design by GamelordProductions.com


 Laser Pro Line